follow us on:

      follow GPI Design on Google Plus  follow GPI Design on Pinterest

Beneath the Surface Blog


Creating Continuous LED Backlighting: 4 Types of Light Seams to Consider

GPI Design - Tuesday, May 17, 2011

Natural sunlight is a seamless light that provides enveloping spatial qualities, free from interruption. With designers increasingly turning to nature for design inspiration, recreating this smooth quality can be tricky with artificial lighting technology. How do you avoid choppy, spotty, discontinuous appearance within your artificial lighting sources?

When translating your design from small samples to fully cladding an entire wall, don’t forget that the every material has its scalar limits. (Yes, even LED light panels are limited to 4’ x 9’ sheets!) This means that for a cladding a 10’ x 40’ backlit glass wall, you could have anywhere from 11 to 100 individual LED light panels, and probably only 8 glass panels. How do we make those seams in the lighting disappear? It depends on the specific condition and how the Flat-Lite™ LED panels are designed.  At GPI, we use these terms to qualify what type of light seam we are designing around:

1. Non-powered field seam

Flat LED Light Panel Hot Spots in Seams

Non-powered field seam condition without diffusing methods or correct cavity

This type of edge does not have LEDs located on it, but when light bounces off the edge of the panel, a slight bright spot still occurs. When non-powered field seams are located in the center (or “field”) of the surface panel, it can become apparent. Calculating the correct lighting cavity (situating the surface the correct distance away from the light source) typically mitigates the evidence of a non-powered field seam.

2. Powered field seam

Flat LED Light Panel Hot Spots in Lighting Seams

Powered field seam condition without diffusing methods or correct cavity

Powered field seams are the illuminated edge along which the LED light sources are located. These are the brightest and most susceptible of seams. When butted together and placed behind the center of a continuous surface panel (glass/resin/stone/fabric), powered field seams can create a very evident bright line. Without finish trims and edge treatments to disguise the bright line, their location within the center continuous surface makes them even more apparent. Diffusing panels and optic films are often applied to the Flat-Lite™ LED panels to disguise the evidence of a powered field seam.

3. Powered perimeter

Infuse Flat LED Light Panel Hot Spots Around Perimeter

In gray circle: powered perimeter without any diffusing methods

A powered perimeter is an edge with LED light sources located around the perimeter of your feature (where it meets the wall, ceiling, or finish trim). The powered edge seam doesn’t fall in the middle of a glass or onyx panel, so it doesn’t appear as disruptive as #2, but can provide evidence of bright spots.

4. Non-powered perimeter

Infuse Flat LED Light Panel Continuous Even Light

In gray circle: non-powered perimeter without any diffusing methods


The non-powered perimeter is our best friend. This condition does not contain LED light sources and is usually tucked away.  When all of the other conditions are diffused, it typically fades away quietly into the background, with little attention needed.

--> Don’t think that testing with one small lighting sample that appears continuous in a small square means your design work is done.  Pay careful attention when translating the lighting design to full scale panels, with particular attention to how the lighting panels meet at seams and match up with your surface module sizes.

Thursday Salute to Originals: Truth Windows

GPI Design - Thursday, April 14, 2011

Our typical backlit project involves bold and intricate moves of concealment (hiding evidence of light, structure, seams, external supports… the list goes on), and leads to a natural curiosity for designers to learn how we assemble those walls/ceiling/floors. So I was understandably refreshed to see the architectural topic of “Truth Windows” pop up on my Google Reader this morning.

These small niche-like elements allow a deeper and more analytic view into construction methods. False windows are punched through the inside walls of straw and timber homes to allow a glimpse of the materials and layers used in the wall construction. Maybe it’s their petite size and battered wooden framing that makes them so quaint, but there’s something charming and imaginative about discovering one of these in a standard home setting.

Hmmm, how would our next backlit onyx wall look with a small “truth window” right at eye level, for building users to see the innards of our creations?

How could this idea translate to commercial and public space?

Image credit: Dornob

Detailing Backlit Onyx Panels: Why There Isn’t a “Typical”

GPI Design - Monday, January 03, 2011

In studying our website metrics that indicate which keywords our visitors are searching for, it’s mind-boggling how many designers are searching for answers to detailing backlit panels. And while we love to stock our website full of useful information that makes it easy for busy designers to quickly understand and specify our systems, typical details can sometimes actually hurt the process.

When backlighting architectural panels, there are many considerations that affect the arrival at a detail.   It’s a process that we forge through per job.  As an architect or designer, can you imagine if your potential clients (developers or building owners) called you up and asked to see a typical floor plan from your firm? Sure, there is a general aesthetic and personality to your design process, but each solution is generated by working through several design phases/iterations, and that’s what makes the finished project unique. A single floor plan doesn’t fully do justice to all of the variables that affected that final solution. That’s how much attention and iteration goes into one of our details; they’re like our blueprints.  

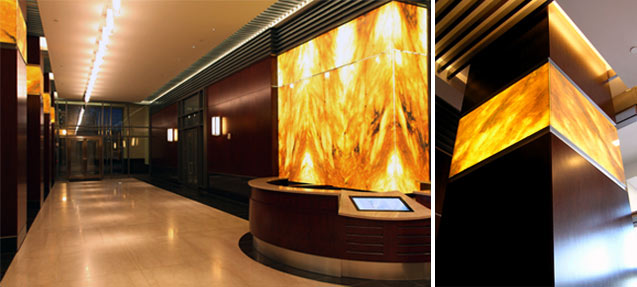
Here is a wall section detail we generated for a specific project that incorporated backlit onyx panels. The variables:Backlit Onyx Wall Shop Detail Example

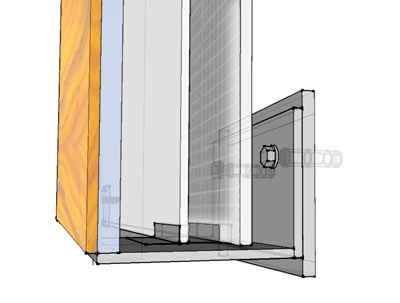
  • Surface type and translucency levels
  • Surface thickness
  • Light source (method, panel sizes, color temperature, brightness)
  • Necessary diffusers
  • Structure and fastening method
  • Ideal spacing between elements (this can only be derived from physical testing)

As you can see,we develop our details based on the above considerations, and they must be considered holistically to achieve high-quality finished works.

The honest truth? For backlighting architectural panels, you don’t need typicals. Rely on a company's portfolio and expertise to trust that they will arrive at an equally thoughtful solution for your backlit project.

Learn more about our custom solution for the backlit onyx lobby features at the Wells Fargo Center:

Backlit Onyx Lobby Feature Wall at Wells Fargo Center

Exterior Stone Panels at Denver Justice and Detention Center

GPI Design - Monday, December 06, 2010

For this recently completed commercial courthouse project in Denver, GPI's involvement ranged from stone selection, detailed shop tickets, quality control in production, and shipping coordination.  Our skilled installation partners at Cleveland Marble Mosaic took the reins on-site to complete the installation with skilled craftsmanship. These stone panels and cladding fit seamlessly into existing site conditions for a classic design statement in natural stone - fitting for a government courthouse.

With attention to detail from design to shop tickets to production to installation, over 230 tons of exterior stone panels were delivered cut-to-size for a smooth installation.

Denver Justice Exterior Stone Cladding Panels View 2

Denver Justice Exterior Stone Cladding Panels View 1

Stone Tickets

  • Over 230 tons of natural stone material
  • Thousands of stone panels in various shapes/sizes/thicknesses
  • Angular, curved, thermal, miters, saw cuts, kerfs, pin holes, varying thicknesses
  • Highly customized stone tickets
  • Under 1% of pieces were incorrect or didn’t fit on-site

Shipping and Coordination

  • Sequenced in 16 containers in conjunction with layout on site and installation schedule
  • Packed and shipped with 0% breakage

Architect: Studio Insite

General Contractor: Hensel Phelps Construction Company

Stone Contractor: Cleveland Marble Mosaic Company

Photos courtesy: denverjusticecenter.com and denvergov.org

Backlit Glass Panels Form A Glowing Feature Wall in Lancaster: A Brief Case Study

GPI Design - Monday, November 15, 2010

Bringing together fine art photographs of natural grasses, custom bent glass, and LED backlighting can be difficult – throw in a curved shape with a narrow lighting cavity and the stage was set for this example of custom integration at the lobby of Lancaster General Health Women and Babies Hospital.

Architects Noelker and Hull wanted to bring soothing natural elements to the entrance lobby of this hospital in Lancaster, PA. Artist Henry Domke’s fine art images were commissioned, and Skyline Design fabricated the prints onto bent glass panels. The designers knew they wanted to showcase these artistic glass panels with seamless backlighting.  

1. Design Intent

Rendering of initial design concept for the space

Lancaster Lobby Architect's Rendering

2. Surface

Skyline Design printed Henry Domke's specified image onto optically clear film, which was then applied to the back side of Skyline's bent glass panels.

3. Lighting

GPI analyzed the printed glass surface to calibrate the ideal diffusing method and lighting cavity.

Below left: glass in direct contact with LED panel, without diffusers

Below right: specialty diffuser between glass and LED panel plus small air cavity to increase light diffusion

Backlit Glass Panels Both With and Without Diffusion Method

4. Structure

Section detail showing the overall assembly - glass was run in channels on the floor and ceiling

Lancaster Wall Section of Backlit Glass Panels

5. Detailing

All wire exits were detailed in a staggered arrangement to avoid extensive gaps between panels.

Shop Drawing of LED Panels and Wire Exits

6. The Result

Seamlessly illuminated dramatic glass feature wall

Lancaster Illuminated Glass Feature Wall

---> Here’s what we learned from working through this project. Keep these tips in mind when designing illuminated glass feature walls:

  • Make sure that your glass supplier and lighting supplier maintain direct communication so that each company can calibrate their product based on the given set of parameters.
  • Don’t skimp on physical mock-ups. Because flat LED panels emit varying brightness based on the panel sizes, each job must be analyzed individually in order to determine the ideal LED panel size, lighting cavity and proper diffusers.
  • Seams between flat LED panels are the most susceptible area.  Hot spots can occur when two LED strings are placed back-to-back. Seams can also create shadows if wire exits create large gaps that push the panels apart.
  • Printed glass can be highly translucent, with great risk of hot and cold spots appearing on the surface (regardless of what type of lighting you use). Check with your glass manufacturer to see if they can treat the back surface of the glass with texture or diffusion layers – or make sure your lighting manufacturer can provide the appropriate diffusing panels.

See the final project images >

Backlighting Corian Surfaces: A Brief Case Study

GPI Design - Thursday, October 14, 2010

Considering highlighting a countertop or reception desk with an illuminated white surface? At a recent project for a custom reception desk, smooth white Corian® surfaces were illuminated by GPI’s custom LED backlighting system. Providing an intriguing focal point, the luminous desk has clean lines and a sleek white appearance that was fitting for the space – a high-end architecture firm.


Here’s what we learned through the process of creating this LED backlit Corian reception desk:

1. Corian® Illumination Series Glacier Ice looks best in commercial spaces when illuminated with lighting temperatures in the cool range. (Pictured below with both our Cool White 5300K and Warm White 3500K LED panels.)


2. The Corian® Illumination Series surfaces have excellent light diffusion characteristics, making them ideal for backlighting applications when the appearance of bulb lines is not desired.

3. Given the thickness and light transmission characteristics of the Corian® surface, there is a delicate balance in the calibration of the lighting cavity to both maintain LED panel brightness and eliminate the appearance of hot spots. To maintain brightness by keeping the LED panels close to the illuminated Corian®, LED strings were buried in the casework to disguise bright lines.

4. Based on many factors, including size of LED panels and desk construction, we calibrated that our Infuse™ LED panels should be situated 1 ¼” away from the back of the Corian® panels.

5. Treatment of corners is especially important in maintaining even illumination – we coordinated closely with the millworkers to ensure that the panels were accurately sized to fit into the desk casework. Even a few millimeters of incorrect sizing and the desk would have gaps between the LED panels – resulting in distracting shadow lines.

Creating Unique Works of Art in Stone and Light

GPI Design - Tuesday, September 28, 2010

Upon the dawn of a new project, our architect and designer clients are quick to ask "do you have photographs of a similar application?". (Part of us must think designers are trained to ask those kinds of questions, as logic and an obligation to guide the owner to make sound investments take hold in these early evaluation stages.)

Our proud answer is often, "no". Quite frankly, we'd be bored if the answer to the question was "yes", and so would you. GPI prides itself on achieving unique works of art in stone and light that take extreme engineering feats, technical manipulation of surfaces and lighting... resulting in architectural pieces that are rare, unusual, and downright striking.

Think of the sculptor in this photo-he is reacting both emotionally and logically to a given set of parameters to create a distinct piece. The clay product is not really the focus here (you could buy clay from anywhere); the clay is manipulated by the sculptor's expert hands - formed through experience and insight.

The way that we work is different from what the A/D community typically expects out of a material supplier, so we like to establish early in the game that it’s in everyone’s best interest to view GPI as a member of your creative team and not just a vendor. We will work together to create exquisitely detailed features. If you’re wanting to take a risk for a truly unique piece, send us your sketches and let’s get started setting precedents for the architectural community.

Photo credit: User bdjsb7 via Flickr Creative Commons

Choosing Flat LED Panels Is Only The Start: A Textbook Case

GPI Design - Wednesday, September 01, 2010
A pretty typical situation occurred here at GPI this week.  A lighting design firm had specified our Infuse™ flat LED panels for a large commercial project, and the contractor ended up making a substitution in order to try to save some money.  As it turns out, the substituted LED panel product looks absolutely terrible and the entire team, including the client, is very unhappy.  So, we received a slightly panicked email from the architect and lighting designer asking us to step in and solve the problem. 

We suspect that the substituted product was poorly made, but assuming that it wasn't, there's still a host of problems with the application.  Even if all flat LED panels are created equally, this particular LED company did not pay attention to the details, and ultimately wasted a significant amount of time and money.  The problems? Uneven illumination, panels sized incorrectly, bulky hardware that is interfering with the light, and absolutely no attention to light diffusion strategies... the textbook case for our integrated systems and process.

Budget is indeed a critical issue in building construction.  Flat LED panels are typically used in feature areas of buildings, becoming main spatial focal points that are evaluated with a discriminating eye.  So if you're looking to cut costs, it's not always wise to do so in such high-profile areas. 

The lesson here: investing more money up-front in a system from a company that will perform as you expect will help avoid costly replacements and changes down the line.  Many of our designers, especially our repeat clients, realize this value, but it can be difficult to communicate this seemingly intangible value to their clients.  What strategies do you use to convince building owners to invest in high-end products?

Interior Finish Products: Fire Safety and Flame Spread- What Does It All Mean?

GPI Design - Monday, July 12, 2010

As an integrated engineering, design, and supply firm, we frequently work with suppliers, engineers, designers, and architects to provide our unique backlit onyx features. One topic that seems to be shrouded in mystery is the topic of fire safety and fire requirements. Terms are frequently confused or misused, and data is often difficult to find (if it even exists). So what are the different areas of fire safety?  What guidelines or codes do you have to follow?

First off, every country, and sometimes even city, has its own building codes that specify certain safety requirements in structures.  In the U.S., the most frequently used code is the IBC, (International Building Code) which is put forth by the ICC (International Code Council).

To meet these requirements, certain standards and tests must be carried out.  To this end, technical standards are written that dictate a list of requirements that must be met. These technical standards, or specifications, can be written by private companies, government agencies, or standards organizations- ASTM, ISO, CEN, etc.

Those are the basic terms, for those unacquainted with building codes and standards.  Onward to the flames!  There are two major categories of fire safety ratings.  First there is fire resistance.  Fire resistance deals with the ability of structural components (walls, floors, ceilings, doors) to restrict the spread of flame and maintain structural integrity in a fire. Fire resistance relates to structural fire performance and becomes important after a fire has started and threatens a building's structural integrity.  The fire resistance test method used throughout the United States is ASTM E 119, Standard Test Methods for Fire Tests of Building Construction and Materials.  Fire resistance is usually measured in hours that the material or structure withstands the flame of a certain temperature.

However, not everything in a building must be tested for fire resistance. Interior finishes and exposed materials- wall coverings, ceiling finishes, etc.- are usually tested for flame resistance.  Flame resistance deals with the potential for fire growth within a structure.  Instead of fire resistance, which describes the performance of materials once a fire has already started, flame resistance measures properties in the early stages of a fire. There are several categories within flame resistance; most notably flame spread index and smoke-developed index.

The flame spread index (FSI) measures how quickly a flame propagates, or moves, across a surface. Materials are assigned values in the U.S. using a test known as ASTM E-84, Standard Test Method for Surface Burning Characteristics of Building Materials. Materials are measured on a scale of 0-1000. A low FSI indicates a low burn rate.  Thus, 0 is calibrated to noncombustible materials (i.e. concrete) while 100 is calibrated to 23/32” red oak flooring.  Classification in codes are:


The smoke-developed index (SDI) measures the concentration of smoke given off as a material burns. The index ranges from 0-450, and a low SDI indicates a low smoke development rate.  


Depending on the local codes, building occupancy, and intended building use, different requirements and levels of performance will be needed.  And here at GPI Design, our team of designers, engineers, and architects will work with you to achieve a beautiful LED backlit onyx feature that will meet the codes- and exceed your expectations!


Open Pages: Why You Should Judge a Stone Composition By Its Cover

GPI Design - Monday, March 29, 2010

With precise attention to book-matching, designing with natural stone can result in striking compositions.

Are you familiar with the old adage “measure twice, cut once”? To obtain perfect veining patterns in our stone feature walls, at GPI it’s more like “measure twice. draw a diagram. step back and think about it. call the design department. then cut”.


(Photograph courtesy danielpermanetter via Flickr Creative Commons)

Book-matching is a reflection of stone veining patterns across a joint so that adjacent panels appear as “mirror images”. Think of an open book: the left page is one panel, the right page is another, and the spine of the book is the joint. Book-match patterns are most commonly found in wood veneers, but the same principles apply to dimensional stone and stone veneer as well. Other variations of matching patterns include: blend match, slip match, and diamond match.

The quality of book-matching can make or break that uninterrupted wall of backlit stone that you have envisioned. Disregard the continuity between panels, and you risk having skewed veining patterns that appear to shift and jump as they move across joints. This uncontrolled use of natural stone gives the appearance of a defect or installation error, so care must be taken in the manufacturing and installation process to ensure quality control. Many natural stone panels are pre-fabricated and cut to size, making on-site adjustments costly and time-consuming.


(Above image: Book match/diamond match seams at GPI's Signature Place project)

Because stone possesses movement and graining sculpted by natural processes, each slab is unique. The visual prominence of bookmatching depends on the veining characteristics and color variations of that particular stone in use. The sharp red veins of a stark white onyx are emphasized by precise mirroring (see above photograph), while a more uniformly colored stone surface will have less pronounced book-matching.

To ensure quality book matching, care must be taken when choosing a stone manufacturer. Fluid communication between the sales, design and manufacturing departments is truly the only way to ensure attention to detail. A responsible stone company will have the insight, experience, and quality control standards to achieve those tight seams. Unfortunately, with many typical stone manufacturers, pertinent information is lost as a project moves from stone tickets into production. Make sure to detail your stone wall elevations and call out the particular seams which should be book matched. You've gone to painstaking measures to detail your prominent stone feature, so take a few minutes to ensure that you nail the details.